Archive for the ‘Apple’ Category

Video Server, Part 3: Encoding

Friday, September 14th, 2007

This is the third in a series of articles that will detail the tools and methods I’m using for my personal media server at home. Part 3: Encoding gets to the meat of the matter, and finally addresses how to turn the DVD into a video file. Future articles will detail converting, integration and disaster management.

Encoding is where all magic happens. The data on the DVD is finally converted to a standalone file to be used in other applications. This is also where most of the confusion lay, where incompatibilities creep in, and where most of the time is spent waiting for the computer to finish something. This time spent waiting is also what makes trial and error such a bitch; depending on your setup, you may have to wait as long as four hours to find out if the file you generated is any good, or if it will work in with your chosen application.

Right up front, let me say that I’m no expert on this subject. I had one goal: decent quality movies at a reasonable size that worked in iTunes. There are a ton of videophiles out there who argue about this codec or that codec, and Dolby digital sound vs. whatever regular old sound is called, but when it comes down to it, I’m interested in convenience and watchability above all else. That being said, though, this method produces a file that’s indistinguishable from DVD, at least to my eyes.

One more caveat, before I delve into the minutiae. I’m going to go through all of the options I set for encoding, but there are a number of places where I didn’t make a conscious decision to do it one way or the other, and I don’t know if changing it will make any difference. For example, in one case I turn auto-cropping on, because I suspected that leaving it off would give me black bars along the top and bottom of my image. I never tried changing it, though, because the settings I’m using give me the results I want.

I played around with a number of different packages on both Mac and PC before I finally ended up using Handbrake v0.9.0 on the PC, a free, open-source, cross-platform package that used to be exclusively for the Mac, but eventually went both ways. It’s not super-fast, but it produces an excellent quality video and is fully operational from the command line; in fact, from what I can tell the GUI is just tacked on to make it easier to build the command line parameter list. In the interest of gratuitous multi-media, however, I’m going to go through configuration using the GUI before recommending you abandon it altogether.

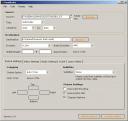
Step 1: Choose your source directory.

The first step, once you start the program, is to choose the directory where you stored your DVD rip. You can find more information on ripping in Part 2 of this series. This example is based on where the files would be after following that tutorial, or F:\FullDisc\JURASSICDTS\VIDEO_TS\.

Fig 1: Choose your source files.

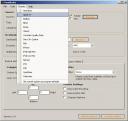
Step 2: Choose AppleTV from the presets:

From the menu bar, choose AppleTV from the preset menu. This will set a number of options.

Fig 2: Choose AppleTV from the presets.

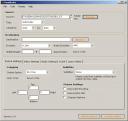
Step 3: Choose the destination and cropping options.
When you specify the destination file through the Browse menu, Handbrake will automatically change the file extension to .m4v, the default file extension for Apple’s movie files. Since a number of my post-encoding scripts were written to use .mp4 files, and I have hundreds of other files with that extension, I change it back to .mp4. This seems to work fine. Under the “Picture Settings” tab, set Cropping to “Auto Cropping”.

Fig 3: Set the destination file and the cropping.

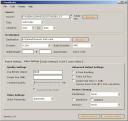
Step 4: Change the bitrate.
Change to the “Video Settings” tab and change the bitrate to 1024. I’ve found this bitrate produces excellent results and a file size of around a Gig for most movies. As far as I know, the value 1024 has no special meaning in this context- it just seemed computer-y.

Fig 4: Change the bitrate.

Step 5: Ditch the GUI.
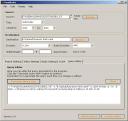
The last tab, “Query Editor”, has button labeled “Generate Query Now”, which will give you the command line options based on your settings. I recommend you copy this text and run Handbrake from the command line:

C:\Program Files\Handbrake\hbcli.exe -i "F:\FullDisc\JURASSICDTS\VIDEO_TS" -o "E:\Upload\Jurassic Park.mp4" -e x264 -E faac -p -m -b 1024 -x bframes=3:ref=1:subme=5:me=umh:no-fast-pskip=1:trellis=2 -B 160 -R 48

… or, if you’re running Cygwin, which I also recommend:

/cygdrive/c/Program\ Files/Handbrake/hbcli.exe -i "F:\FullDisc\JURASSICDTS\VIDEO_TS" -o "E:\Upload\Jurassic Park.mp4" -e x264 -E faac -p -m -b 1024 -x bframes=3:ref=1:subme=5:me=umh:no-fast-pskip=1:trellis=2 -B 160 -R 48

Fig 5: Generate the query if you want to run it from the command line instead

At this point you’ve got a nice file that you can drag into iTunes and watch on your AppleTV. A word of caution, though: on my machine, this process will occasionally fail with a segmentation fault after two to four DVDs. Rebooting and restarting the process works for me.

In the next entry in this series, I will go deal with converting existing files into MP4 files, mostly for dealing with downloaded TV Shows, and after that I will address adding meta-data, such as artwork and plot descriptions, to make your videos pretty. Stay tuned for that- there will be scripts.
No Thumbnail for an Uploaded Image in WordPress

Thursday, September 13th, 2007

A Short Answer to a Specific Question:

If you upload an image in WordPress, and you don’t get the option to “Show Thumbnail” in the “Send to Editor”, it’s probably because the image was too big.

Also: there is no good way to resize an image in iPhoto.

A free tool to resize images on the Mac is ImageWell, from XtraLean Software.

Video Server, Part 2: Ripping

Saturday, September 8th, 2007

This is the second in a series of articles that will detail the tools and methods I’m using for my personal media server at home. Part 2: Ripping is all about getting data off the DVD and onto the computer. Future articles will detail encoding, converting, integration and disaster management.

Note: For the record that I believe ripping data from DVD movies you do not own is illegal, and I do not support it. ((I am not a lawyer, so I don’t know this for a fact. I think I saw it online and I’m repeating it here just in case it’s true.)) If you enjoy a movie, buy it, and support the people who created it… even if entire industry is a bunch of greedy douchebags.

For a while, I didn’t even realize ripping was a thing. I was playing around with different encoding tools, and they all worked the same way: stick the DVD in, twiddle some stuff, and the program read from the disc and wrote to a file. Most of the time, this worked. More and more often, though, I would encounter a problem; either the problem wouldn’t ready my disk, or it would encode about 20 seconds of data and hang. After some research, I eventually discovered something I already knew: most DVDs are encrypted. This is why you can’t just put in a disc and copy the files off it, even though if you explore you can see them clear as day.

I found the solution was a separate program designed to read the DVD and store an unencrypted copy on the harddrive. After some trial and error, I’ve had great results with DVDFab HD Decrypter. Not only is it free and reliable, it’s dirt simple.

Ripping the data to the hard drive separately also has additional benefits: it may cut down on the wear and tear on the DVD-Rom ((I also have no proof of this, it’s just one of those things that seems true. Maybe reading from a disc for 15 minutes at full-bore does more damage than reading a few bits at a time for two hours.)), as ripping takes considerably less time than encoding, and after the initial rip, you can encode without having to be physically present at the machine, or re-encode if something goes wrong.

DVDFab HD - 1

Insert the disc, wait for the chapter data to load, and hit “Start”. If it’s the first time you’re running the program, also specify the Target: directory.

DHDFab HD - 2

The process usually takes between 10 and 20 minutes.

Afterward, you will find a subdirectory in the FullDisc directory in the Target directory: <Target>/FullDisc/<DVD>. In the above example, the data I want is in F:\FullDisc\BLUSBRO\VIDEO_TS\.

I don’t do a lot of ripping on the Mac, but the few time I have, I’ve had good luck with Mac the Ripper.

Next Up: Encoding.

iPhone Rebate

Friday, September 7th, 2007

Steve Jobs announced today that they intend to give a $100 store credit to everyone who bought an iPhone before the price drop. Gizmodo has the full text of his announcement, but here is the part that I feel addresses my concerns from the other day:

“Our early customers trusted us, and we must live up to that trust with our actions in moments like these.”

Some might argue that a cash rebate would be better; since any money I save up is going to a new Mini anyway, this works out pretty well for me.

iPhone Price Drop

Wednesday, September 5th, 2007

Apple just finished up their special event this morning. Among other things, they announced a $200 price cut for the iPhone. I’m sure this is all well and good from a business standpoint, but I do feel kind of screwed. I bought the phone on day one, and while I don’t regret it, I might not have gone through the uncertainty of early adoption if I knew I could wait a measly two months and saved several hundred dollars. For taking a chance on an untested, controversial new product, it feels like Apple owes me a little more loyalty.

This also gives everyone who said the iPhone was too expensive an excuse to say “I told you so.” Apple could have waited until November to announce the cut, given us another couple of months to feel good about our purchase, and still had plenty of time to boost sales for the holiday season.

I’ll just have to take some solace in the fact that, as a stock holder, I’ll probably make a little money off the whole deal.

Patrick Gets an iPod

Sunday, August 19th, 2007

For Christmas last year, my sister gave me one of those spiffy new video iPods, and it launched me off into another video server project. At first, I just wanted to rip some DVDs to play on my new toy, but of course, one thing led into another, and I now I’m off on a whole thing.

Collecting files has always been a constant struggle balancing convenience, space, and redundancy. How do you maintain a system that’s easy to access, easy to expand, and will be safe in case of catastrophic failure?

I’ve been a file packrat for years, and I’ve never been able to work out a cost-effective way to deal with the constant struggle of balancing convenience, space, and redundancy. How do you maintain a system that’s easy to access, easy to expand, and will be safe in case of catastrophic failure? Time and time again I amass a huge mountain of music and video files that eventually overwhelm me and become more trouble than they’re worth. The hard drives end up in a cardboard box filled with packing peanuts, the CD or DVD backups end up on spindles on the shelf, and I wash my hands my of the whole thing for a year or two. Invariably, though, drives get bigger, hardware gets cheaper, and some neat new thing comes along to inspire me to dig everything up and start over again.

This time, I intend to document my proccess as I go along: the hardware, the software, the various settings, and the missteps. I don’t anticipate this information being particularly usefull to others, though, as a home theater is as unique as the person who decides to build one- there are hundreds of possible combinations for encoding and playback, and what is considered “acceptable quality” can differ greatly from geek to geek.

No, my goal is to have a record of how everything works so i don’t have to start from scratch after the next big lull, and (hopefully), to provide some regular content for this stupid site.