Run ‘screen’ and reconnect to the same session without arguments

September 16th, 2007

This is just a little nugget I’ve had around for a while. I’m dusting it off and posting here more to test the WP-Syntax WordPress Plugin than any other reason.

I use screen, but I don’t leave myself logged in when I’m not at my computer. I can usually type ‘screen -R’ to reconnect to the same session the next day, but if I have more than one screen session running at once, I need to ‘screen -ls’, then figure out which one to reattach to. At least I think I need to do that… in addition to being to lazy to do all that, I’m too lazy to scour the man pages looking for the way to make it create or reattach to the same session every time.

If you call ‘screen’ with parameters, they will be used instead… This should allow you to use screen completely normally when necessary.

#!/bin/sh
# Rename your screen binary to something else to get it out of
# the way, and save this script as 'screen' into the same
# directory. Make a note of what you called the original here:
SCREEN="/usr/local/bin/screen1"

# Make $DEFAULT_NAME whatever you want; you'll never actually see it:
DEFAULT_NAME="default_session"

if [ "$#" -eq 0 ]; then
    SCREENLS=`$SCREEN -ls | grep "$DEFAULT_NAME"`
    if [ "$SCREENLS" = "" ]; then
        $SCREEN -S "$DEFAULT_NAME"
    else
        $SCREEN -r "$DEFAULT_NAME"
    fi
else
    $SCREEN $@
fi

Video Server, Part 3: Encoding

September 14th, 2007

This is the third in a series of articles that will detail the tools and methods I’m using for my personal media server at home. Part 3: Encoding gets to the meat of the matter, and finally addresses how to turn the DVD into a video file. Future articles will detail converting, integration and disaster management.

Encoding is where all magic happens. The data on the DVD is finally converted to a standalone file to be used in other applications. This is also where most of the confusion lay, where incompatibilities creep in, and where most of the time is spent waiting for the computer to finish something. This time spent waiting is also what makes trial and error such a bitch; depending on your setup, you may have to wait as long as four hours to find out if the file you generated is any good, or if it will work in with your chosen application.

Right up front, let me say that I’m no expert on this subject. I had one goal: decent quality movies at a reasonable size that worked in iTunes. There are a ton of videophiles out there who argue about this codec or that codec, and Dolby digital sound vs. whatever regular old sound is called, but when it comes down to it, I’m interested in convenience and watchability above all else. That being said, though, this method produces a file that’s indistinguishable from DVD, at least to my eyes.

One more caveat, before I delve into the minutiae. I’m going to go through all of the options I set for encoding, but there are a number of places where I didn’t make a conscious decision to do it one way or the other, and I don’t know if changing it will make any difference. For example, in one case I turn auto-cropping on, because I suspected that leaving it off would give me black bars along the top and bottom of my image. I never tried changing it, though, because the settings I’m using give me the results I want.

I played around with a number of different packages on both Mac and PC before I finally ended up using Handbrake v0.9.0 on the PC, a free, open-source, cross-platform package that used to be exclusively for the Mac, but eventually went both ways. It’s not super-fast, but it produces an excellent quality video and is fully operational from the command line; in fact, from what I can tell the GUI is just tacked on to make it easier to build the command line parameter list. In the interest of gratuitous multi-media, however, I’m going to go through configuration using the GUI before recommending you abandon it altogether.

Step 1: Choose your source directory.

The first step, once you start the program, is to choose the directory where you stored your DVD rip. You can find more information on ripping in Part 2 of this series. This example is based on where the files would be after following that tutorial, or F:\FullDisc\JURASSICDTS\VIDEO_TS\.
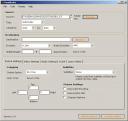
Fig 1: Choose your source files.

Step 2: Choose AppleTV from the presets:

From the menu bar, choose AppleTV from the preset menu. This will set a number of options.
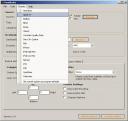
Fig 2: Choose AppleTV from the presets.

Step 3: Choose the destination and cropping options.
When you specify the destination file through the Browse menu, Handbrake will automatically change the file extension to .m4v, the default file extension for Apple’s movie files. Since a number of my post-encoding scripts were written to use .mp4 files, and I have hundreds of other files with that extension, I change it back to .mp4. This seems to work fine. Under the “Picture Settings” tab, set Cropping to “Auto Cropping”.
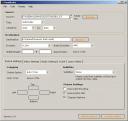
Fig 3: Set the destination file and the cropping.

Step 4: Change the bitrate.
Change to the “Video Settings” tab and change the bitrate to 1024. I’ve found this bitrate produces excellent results and a file size of around a Gig for most movies. As far as I know, the value 1024 has no special meaning in this context- it just seemed computer-y.
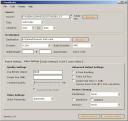
Fig 4: Change the bitrate.

Step 5: Ditch the GUI.
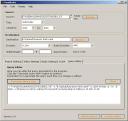
The last tab, “Query Editor”, has button labeled “Generate Query Now”, which will give you the command line options based on your settings. I recommend you copy this text and run Handbrake from the command line:

C:\Program Files\Handbrake\hbcli.exe -i "F:\FullDisc\JURASSICDTS\VIDEO_TS" -o "E:\Upload\Jurassic Park.mp4" -e x264 -E faac -p -m -b 1024 -x bframes=3:ref=1:subme=5:me=umh:no-fast-pskip=1:trellis=2 -B 160 -R 48
… or, if you’re running Cygwin, which I also recommend:

/cygdrive/c/Program\ Files/Handbrake/hbcli.exe -i "F:\FullDisc\JURASSICDTS\VIDEO_TS" -o "E:\Upload\Jurassic Park.mp4" -e x264 -E faac -p -m -b 1024 -x bframes=3:ref=1:subme=5:me=umh:no-fast-pskip=1:trellis=2 -B 160 -R 48

Fig 5: Generate the query if you want to run it from the command line instead

At this point you’ve got a nice file that you can drag into iTunes and watch on your AppleTV. A word of caution, though: on my machine, this process will occasionally fail with a segmentation fault after two to four DVDs. Rebooting and restarting the process works for me.

In the next entry in this series, I will go deal with converting existing files into MP4 files, mostly for dealing with downloaded TV Shows, and after that I will address adding meta-data, such as artwork and plot descriptions, to make your videos pretty. Stay tuned for that- there will be scripts.

No Thumbnail for an Uploaded Image in WordPress

September 13th, 2007

A Short Answer to a Specific Question:

If you upload an image in WordPress, and you don’t get the option to “Show Thumbnail” in the “Send to Editor”, it’s probably because the image was too big.

Also: there is no good way to resize an image in iPhoto.

A free tool to resize images on the Mac is ImageWell, from XtraLean Software.

Short Answers to Specific Questions

September 13th, 2007

I’ll be perfectly frank; I don’t like blogs. For the most part, I think they’re pretentious, self centered, and everytime someone references “my audience” when they’re not talking about a show they were headlining at Shoreline, I have the mild urge to cram a squirrel in ’em.

That being said, though, I’ve often thought that if I were ever to start a blog, in addition to whatever hare-brained reason I had for doing it in the first place, I would also try to add a little bit to the sum total of human knowledge by occasionally posting the one thing I’m always grateful for when I’m lucky enough to find it: the short answer to the specific question.

From now on, when I’m searching for one specific piece of information, or the answer to a very direct technical question, I’ll try to post it here, so on the off chance that someone else is looking for it, they might stumble on it. You never know.

Learning to Pick my Battles: Doing Less to Accomplish More

September 13th, 2007

I’ve had to make some difficult choices in the last few days.

Though it may not seem like it, this site represents a lot of time and effort; the haphazard design, confusing menus and utter lack of documentation mask a fairly complex and powerful back end. Unfortunately, it’s become clear that this complexity renders it more inefficient than I feared; even with no traffic there’s enough database activity to occasionally bring down the server.

Not coincidentally, these problems started just as my blogging efforts were finally getting underway… efforts which also revealed, in flashing neon visible from space, all the reasons that people use a professional content management packages. For one post, I had to add at least three new features: image uploads, thumnails and comments. Please remember that it was never my intention to build a content management system. Every feature on the site, including the blog, was supposed to be a proof-of-concept test for the underlying code.

That’s when it finally hit me how much work would be to get even minimally usable blogging code written. I wouldn’t be able to blog those efforts, or anything else, until I was finished; and even if I could half-ass it, the code still wouldn’t actually support any traffic… so it better not be good, or god-forbid, popular.

This put me in a funk.

Faced with the prospect of toiling indefinitely and having nothing to show for my efforts but a broke-ass pile of crap, I was forced to concede that there’s only one solution: I’m going to move to WordPress for content management.

Once I finally got the taste of defeat out of my mouth and over the urge to junk everything and move to Miami, I realized that this is actually a great option, and something I should have done a long time ago- it takes a number of things off my plate that I never wanted to do anyway, it removes the pressure of having to use my pre-alpha code to support an actual site, and it will give me a personal homepage I’m not ashamed of.

This is the perfect example of learning to pick my battles; by reducing the scope of what I’m working on, I should be able to accomplish quite a bit more.

Hopefully.

Video Server, Part 2: Ripping

September 8th, 2007

This is the second in a series of articles that will detail the tools and methods I’m using for my personal media server at home. Part 2: Ripping is all about getting data off the DVD and onto the computer. Future articles will detail encoding, converting, integration and disaster management.

Note: For the record that I believe ripping data from DVD movies you do not own is illegal, and I do not support it. ((I am not a lawyer, so I don’t know this for a fact. I think I saw it online and I’m repeating it here just in case it’s true.)) If you enjoy a movie, buy it, and support the people who created it… even if entire industry is a bunch of greedy douchebags.

For a while, I didn’t even realize ripping was a thing. I was playing around with different encoding tools, and they all worked the same way: stick the DVD in, twiddle some stuff, and the program read from the disc and wrote to a file. Most of the time, this worked. More and more often, though, I would encounter a problem; either the problem wouldn’t ready my disk, or it would encode about 20 seconds of data and hang. After some research, I eventually discovered something I already knew: most DVDs are encrypted. This is why you can’t just put in a disc and copy the files off it, even though if you explore you can see them clear as day.

I found the solution was a separate program designed to read the DVD and store an unencrypted copy on the harddrive. After some trial and error, I’ve had great results with DVDFab HD Decrypter. Not only is it free and reliable, it’s dirt simple.

Ripping the data to the hard drive separately also has additional benefits: it may cut down on the wear and tear on the DVD-Rom ((I also have no proof of this, it’s just one of those things that seems true. Maybe reading from a disc for 15 minutes at full-bore does more damage than reading a few bits at a time for two hours.)), as ripping takes considerably less time than encoding, and after the initial rip, you can encode without having to be physically present at the machine, or re-encode if something goes wrong.

DVDFab HD - 1

Insert the disc, wait for the chapter data to load, and hit “Start”. If it’s the first time you’re running the program, also specify the Target: directory.

DHDFab HD - 2

The process usually takes between 10 and 20 minutes.

Afterward, you will find a subdirectory in the FullDisc directory in the Target directory: <Target>/FullDisc/<DVD>. In the above example, the data I want is in F:\FullDisc\BLUSBRO\VIDEO_TS\.

I don’t do a lot of ripping on the Mac, but the few time I have, I’ve had good luck with Mac the Ripper.

Next Up: Encoding.

iPhone Rebate

September 7th, 2007

Steve Jobs announced today that they intend to give a $100 store credit to everyone who bought an iPhone before the price drop. Gizmodo has the full text of his announcement, but here is the part that I feel addresses my concerns from the other day:

“Our early customers trusted us, and we must live up to that trust with our actions in moments like these.”

Some might argue that a cash rebate would be better; since any money I save up is going to a new Mini anyway, this works out pretty well for me.